Line of Sight Configuration Tutorial
In this tutorial, we will see how to construct a layerset to compute line of sight (viewsheds). We will use default values for most properties, which will give us a ground-based observer that wants to see the ground, and can see in all directions to a maximal distance.
The text gives step-by-step instructions to construct the layerset. However, the final configurations are also available in the .../samples/MapConfigurations/ folder, as line_of_sight.px and line_of_sight_trees.px.
Some familiarity with Carmenta Studio is assumed.
Background map
As a background, we want a simple topographic map that just shows shaded elevations and land use. We will start from an existing sample configuration.
Load .../samples/MapConfigurations/topographic_map.px into Carmenta Studio. Save it somewhere as line_of_sight_tutorial.px.
Rename the view object from TopographicMap to mainView.
Remove (or disable) the following layers:
Vegetation
ElevationColoring
Aerial_photo_bw
Foreground_Layers
NamesAndRoadSigns
Legends
(To remove a layer, right-click and choose Delete All. To disable a layer, let its Layer.Enabled be False.)
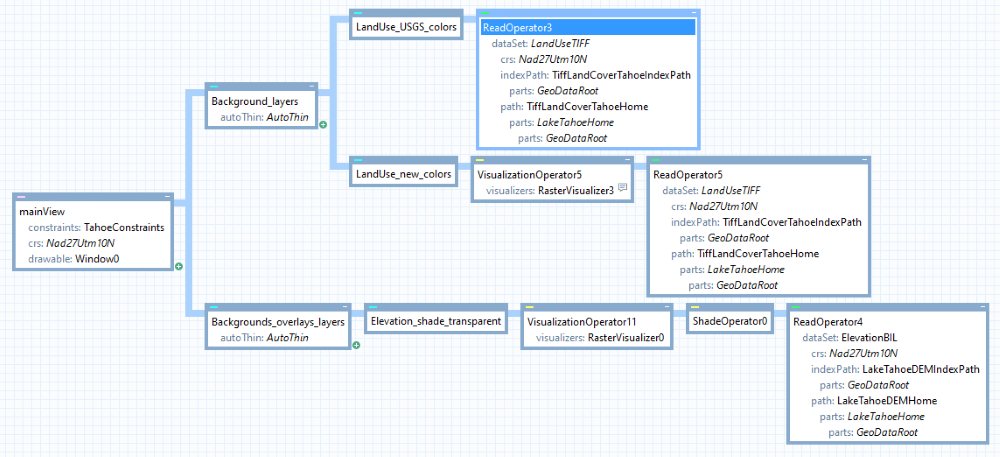
If you have removed the layers, your configuration should now look like this:
 |
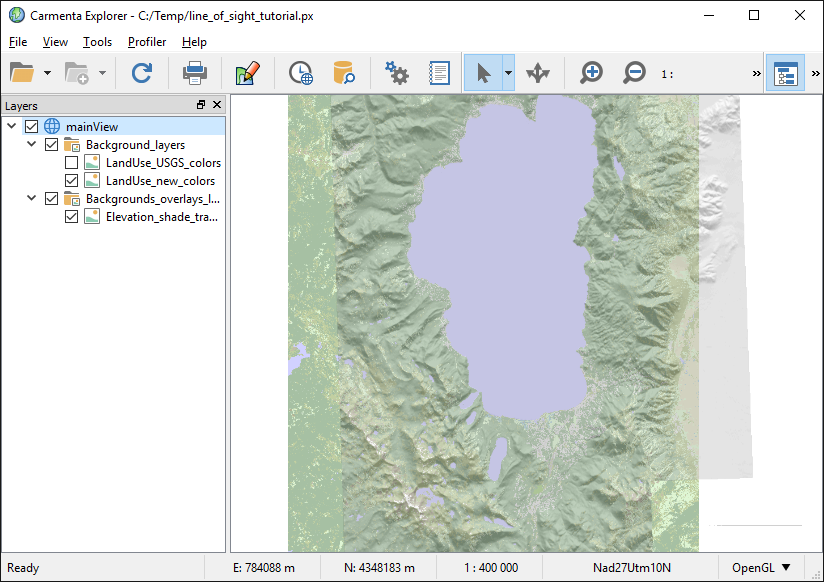
Modify the mainView.center to [758000.0, 4324000.0 ], and set the mainView.nominalScale to 400000. If you enable the LandUse_new_colors layer, it will look like this in Carmenta Explorer:
 |
Adding a Basic Viewshed Layer
We shall first ignore the forests, and base our visibility analysis only on ground elevations. So let us disable the LandUse_new_colors layer again.
Make a new LayerSet and place it last in the view; call it Viewshed_layers. Attach a new OrdinaryLayer; call it Viewshed. Attach a VisualizationOperator and then a LineOfSightOperator.
Copy ReadOperator4 (that reads ElevationBIL) to the LineOfSightOperator.elevationInput (Right-click and drag the ReadOperator4 to your LineOfSightOperator, drop it there, choose Copy Here and choose elevationInput). The ElevationBIL dataset is now shared between the two read operators.
To your LineOfSightOperator.observerInput, add a new ReadOperator that reads from a new MemoryDataSet, which you can rename to ObserverMemoryDataSet. The choice of Crs for the memory dataset is not so important, but you can use the same one as ElevationBIL uses (right-click on Nad27Utm10N, drag it onto the memory dataset, and choose Create Reference Here.)
Your new layer should now look like this:
 |
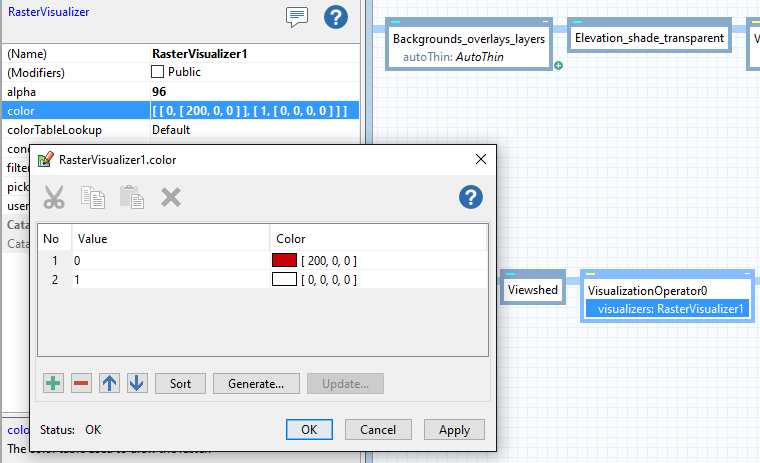
To display a viewshed, you must attach a RasterVisualizer to your VisualizationOperator.Visualizers. Let its alpha be a nice semitransparent value like 96 (this is a global alpha for all colors). To choose the color table, remember that by default (when you do not model tree heights), the viewshed rasters will contain zeros where the ground is visible and positive numbers elsewhere. So you can use a color table like this:
 |
In a real application, you may want to set the RasterVisualizer.Filter to something smoother, but the default NearestNeighbor is useful for this tutorial, since it makes it easier to see the resolution of the viewshed.
And the last step to be able to do the analysis is to place some observers, that is to say where to look from. That is done by adding point features or line features to the ObserverMemoryDataSet that we connected to observerInput. This would usually be done by creating features dynamically in the application as a result of user interaction (user clicking in map or something similar), but for this little tutorial without an application we can add a point feature in the configuration.
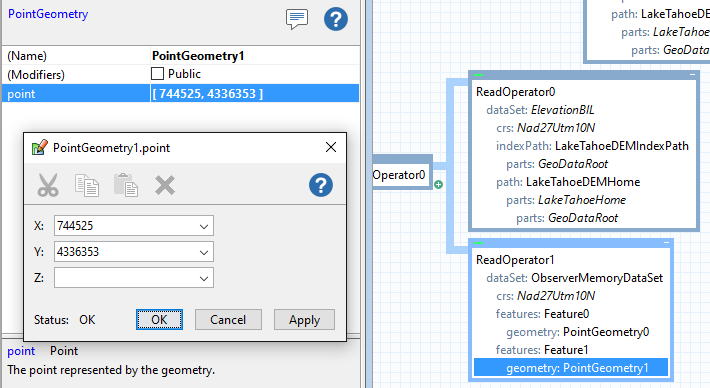
Select the ObserverMemoryDataSet and add a new feature. Then add a PointGeometry to the feature. Set its point coordinates to be X = 759335 and Y = 4309705. (The Z can be ignored, since the default LineOfSightOperator.CarrierType is GroundBased, so that the observer will be placed VisibilityOperator.SensorHeight above ground.) Add another point feature at X = 744525, Y = 4336353.
 |
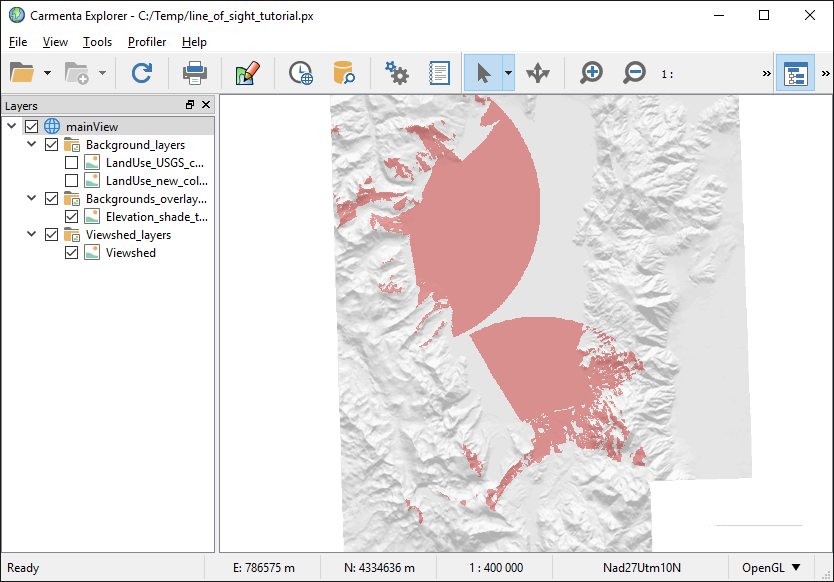
If you save the file and reload it in Carmenta Explorer, the result will now look like this:
 |
Displaying Observer Position and Maximal Range
We can now add a new OrdinaryLayer, call it Observer, that shows the observer position with a symbol, for example the predefined Symbols.roundedSquare.
And we add yet another OrdinaryLayer, call it MaxRange, that shows the maximal range as a circle, generated by an EllipseOperator.
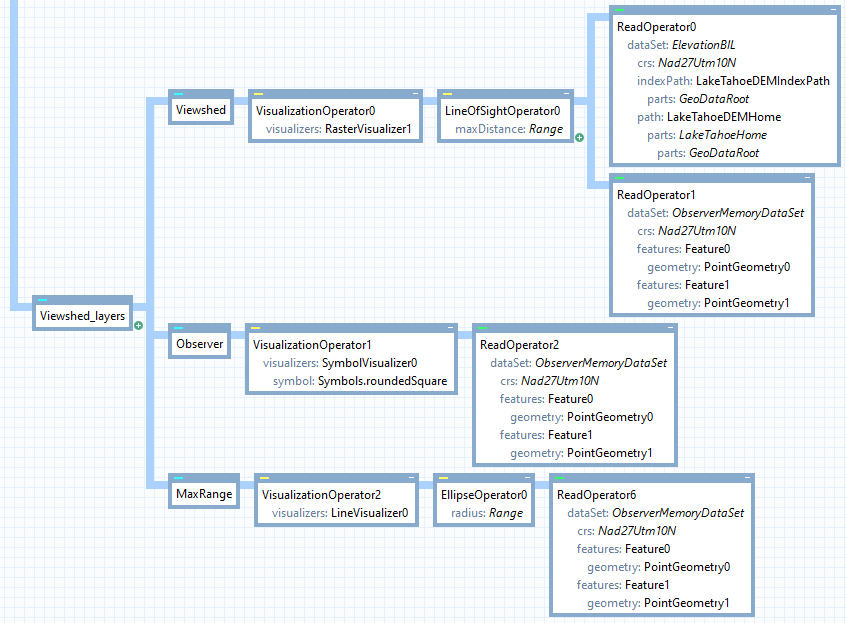 |
You should let your EllipseOperator.Radius be as long as your LineOfSightOperator.MaxDistance.
Simple way: let both properties be the same constant.
Better way: let both properties be the same attribute variable, which looks up its value from an observer attribute. Then, you must set a RANGE attribute for each observer feature in the ObserverMemoryDataSet. For example, let Feature0 have RANGE = 20000.0 and Feature1 have RANGE = 15000.0.
If you use the better way as above, the result in Carmenta Explorer should now look like:
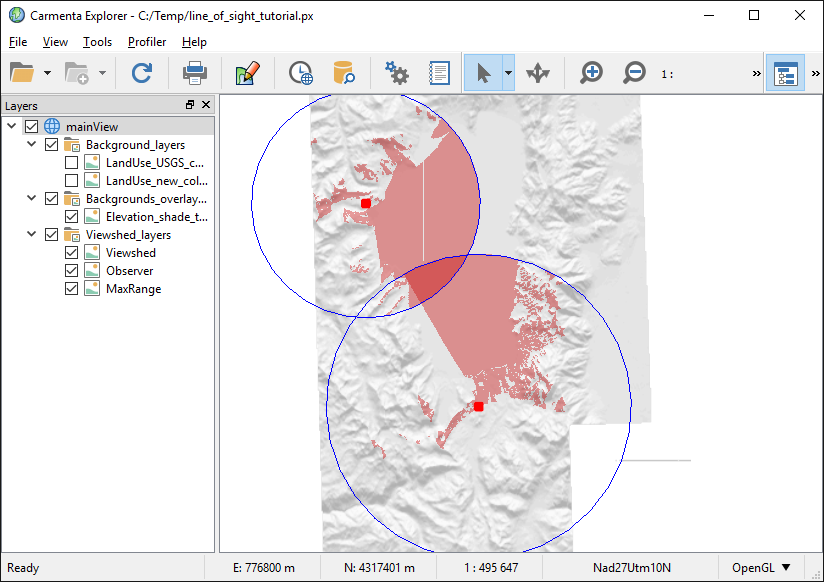 |
The southern observer now has a longer range, so the viewsheds intersect. The intersection is darker, since the viewshed color is semitransparent.
In this screenshot, you can also see a line artifact in the northmost viewshed: this will be discussed below, in the section "How elevation overviews are used".
Moving the Observer
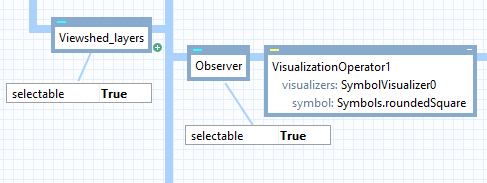
The observers can be moved via Carmenta Explorer. But you must first let the Viewshed_layers layerset and the Observer layer be selectable.
 |
You can now move an observer symbol in Carmenta Explorer by drag-and-drop, and its viewshed will be updated continuously.
In the next section, we shall see how to trade accuracy for speed.
How Elevation Overviews are Used
You may have noted straight or square-shaped line artifacts in the viewsheds, as in the screenshot above. They can appear at the boundaries between partial viewshed results that have different resolution. The ElevationBIL dataset has been constructed with rasterCachePolicy = Overviews, which allows it to produce elevations not only in the highest 10 m resolution, but also in an overview resolution of 20 m, 40 m, 80 m, 160 m or 320 m, depending on the data request. The LineOfSightOperator exploits the available overviews to speed up the computation; see VisibilityOperator.FirstResolutionChange for details. A lower value of this property gives faster computations that use more levels of overviews and produce coarser viewsheds, which nevertheless seem to be quite accurate. Do try it out!
If an elevation dataset uses RasterCachePolicy = None, it is possible that overviews are available anyway, depending on the type of dataset. However, if no overviews are available, the line-of-sight operator will nevertheless request elevations in the overview resolutions that it needs, and will resample its input rasters if necessary. Resampling on the fly takes longer time, but it lets the LOS operator use elevation overviews with any kind of elevation dataset.
The line artifacts between the viewshed resolutions can become worse than in this configuration, namely if the elevation rasters are stored in LongLat while the View uses some map projection like UTM. One possible way to remove the line artifacts would be to force the LineOfSightOperator to use the finest resolution (10 meters) everywhere, by setting firstResolutionChange to a very large value like 999999999. But the configuration will be much slower, and a very long observer range could throw an exception. With 64-bit Carmenta Engine and an elevation resolution of 10x10 meters as in our Lake Tahoe data, the exception comes when the LineOfSightOperator.maxDistance is 57890 meters or longer.
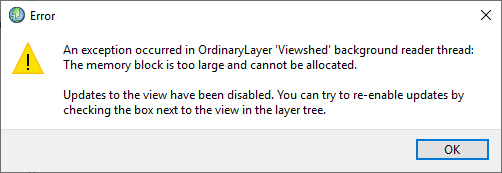 |
The reason is that such a long range would make the viewshed layer try to allocate a raster larger than the maximum of 512 MB (see Runtime.RasterSizeLimitEnabled).
But you can tell the LineOfSightOperator to calculate in a single resolution from one of the elevation overviews, instead of the finest 10-meter resolution. If you set VisibilityOperator.DesiredInputResolution = 20, for example, the operator would use the 20-meter overview, which would allow a longer maxDistance. (For the record, setting a desired input resolution will work also if you have a normal value of firstResolutionChange that gives multiple resolutions: then the desired input resolution would specify the resolution that should be used nearest the observer. So with the Lake Tahoe elevations, it is possible to skip the 10 meter level and use multiple resolutions of 20, 40, 80, ... meters. But this is seldom useful, since some accuracy would be lost and the performance would not improve much.)
Instead of forcing a single-resolution calculation, a better way to remove line artifacts can be to merge the viewshed rasters into one raster before visualization. You can do it with a RasterMergeOperator with operation = Min, inserted just to the left of the LineOfSightOperator. The result would look like this:
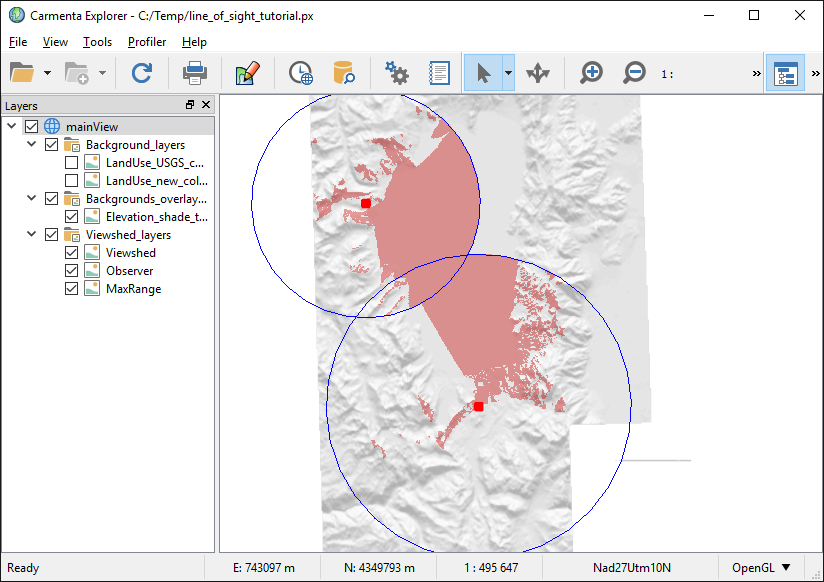 |
The lines between resolutions have disappeared.
Also, the viewsheds have been merged into their union, so that their intersection no longer has darker color. This is what you want when you do not care whether one or many observers can see an area. But if you do care about the number of observers, there are other ways to merge viewsheds: see AirspaceCoverageOperator and Overlapping Viewsheds.
You may notice that the RasterMergeOperator makes it slower to move observers around. To regain some of the speed, you can increase RasterMergeOperator.CellWidth and RasterMergeOperator.CellHeight from their default value 1.0. A value of 2.0, for example, is much faster and looks nearly as good.
But if the operator uses a LineOfSightOperator.CustomPropagation model whose output type is not any kind of height but the unspecified type Other, then merging the output rasters with the Min operation may not be appropriate.
So, for the rest of this tutorial, we shall assume that the RasterMergeOperator has been removed again. The current state of the configuration can be found in .../samples/MapConfigurations/line_of_sight.px (with some minor differences).
Dynamic caching
You may notice that panning and zooming is slower when the Viewshed layer is enabled. We can improve the panning and zooming speed by letting the cacheMode property be Dynamic or DynamicAsync in the Viewshed layer. But note that this works only as long as there is no RasterMergeOperator to the left of the LOS operator, since that would violate the restrictions that the dynamic cache mode imposes on the layer input. The violated restriction is this one:
If the features are modified in the operator chain, the new features must retain the same feature IDs as the original features; this is how most Carmenta Engine operators work.
Unfortunately, the RasterMergeOperator cannot work in this way, since it takes several input features with different feature IDs and merges them into one. For more details, see OrdinaryLayerCacheMode.
Instead of using a RasterMergeOperator to merge the viewsheds, we could replace the LineOfSightOperator with an AirspaceCoverageOperator, which will both calculate the viewsheds and merge them in a configurable way. Surprisingly, the AirspaceCoverageOperator can handle dynamic cache mode – it is the only operator that can do so while violating the restriction on the feature IDs. On the other hand, the AirspaceCoverageOperator does not support calculating viewsheds in multiple resolutions, and we shall not explore it further in this tutorial.
Adding Tree Heights
Trees can have a large effect on visibility, but so far, we have not used them in our LineOfSightOperator.
A problem is that our land use data only gives the type of land use. Since the LineOfSightOperator needs to know the tree heights, we have to use a RasterReclassificationOperator, which converts the land use type to an estimated tree height (or more generally, the height of any stuff that would obstruct a line of sight). Since our elevations are in meters, the obstacle heights should also be in meters.
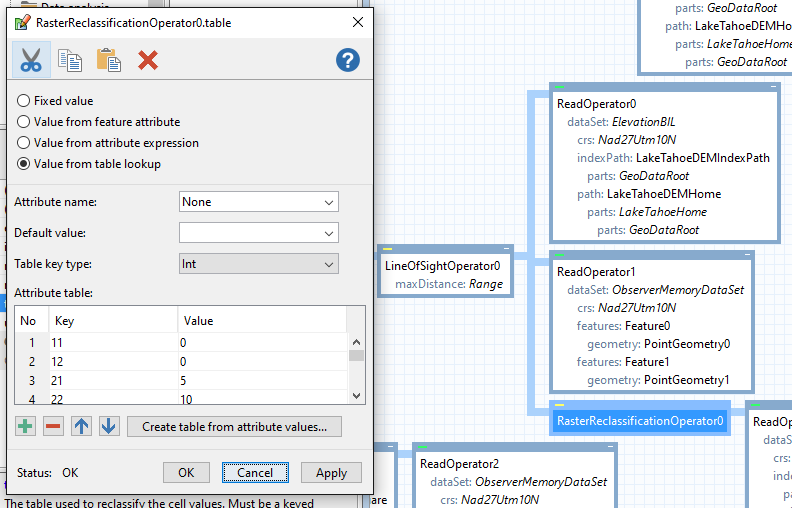
In the table below, the first two columns are taken from the metadata for our land use data ( .../geodata/LakeTahoe/LandCover/nlcd_meta_ca.txt), while the rightmost column is just guesswork.
Land use | Code | Estimated height (above ground) |
|---|---|---|
Open Water | 11 | 0 m |
Perennial Ice/Snow | 12 | 0 m |
Developed: Low Intensity Residential | 21 | 5 m |
Developed: High Intensity Residential | 22 | 10 m |
Developed: Commercial/Industrial/Transportation | 23 | 10 m |
Barren: Bare Rock/Sand/Clay | 31 | 0 m |
Barren: Quarries/Strip Mines/Gravel Pits | 32 | 0 m |
Barren: Transitional | 33 | 0 m |
Deciduous Forest | 41 | 20 m |
Evergreen Forest | 42 | 30 m |
Mixed Forest | 43 | 25 m |
Shrubland | 51 | 5 m |
Orchards/Vineyards/Other | 61 | 10 m |
Grasslands/Herbaceous | 71 | 0 m |
Pasture/Hay | 81 | 1 m |
Row Crops | 82 | 2 m |
Small Grains | 83 | 1 m |
Fallow | 84 | 0 m |
Urban/Recreational Grasses | 85 | 0 m |
Woody Wetlands | 91 | 15 m |
Emergent Herbaceous Wetlands | 92 | 5 m |
In our map configuration, attach a new RasterReclassificationOperator to the VisibilityOperator.TreeHeightInput, and then attach a copy of a ReadOperator that reads the LandUseTIFF dataset (in the Background_layers, topmost in the configuration). In the RasterReclassificationOperator, set the table according to the guesses above, and set exactMatch = True.
 |
You may have noticed that the LandUseTIFF uses a different Coordinate Reference System than the ElevationBIL: it uses WGS84 UTM zone 10N instead of NAD27 UTM zone 10 N. The LandUseTIFF also has a coarser resolution, with 30 meter raster pixels instead of 10 meters. This does not matter: the LOS operator will automatically reproject and resample the tree heights into the same CRS and resolution as the elevations.
The current state of the configuration can be found in .../samples/MapConfigurations/line_of_sight_trees.px (with some minor differences).
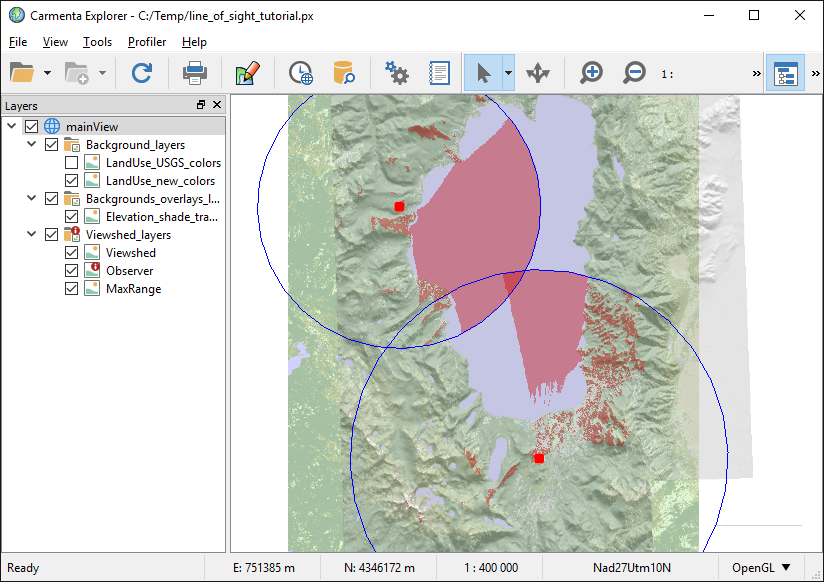
Now the LOS operator will make use of the tree heights:
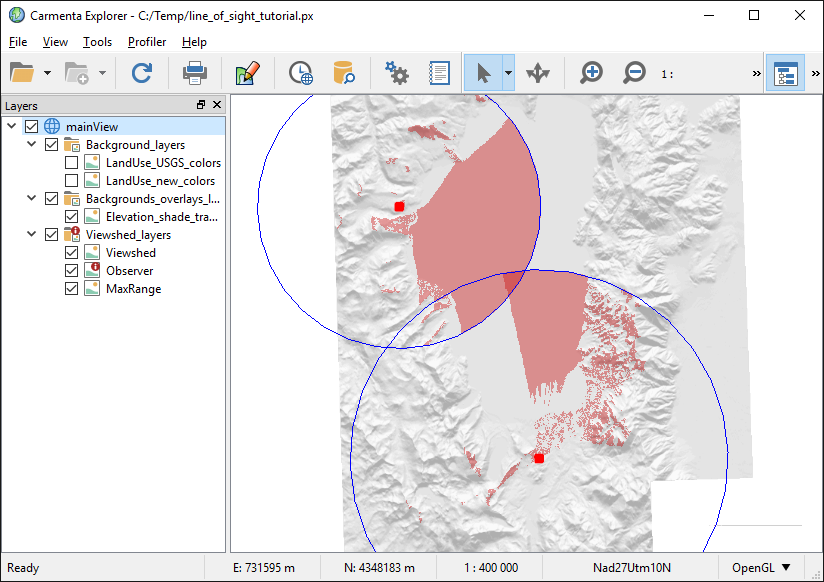 |
We can see that the south viewshed is smaller.
The viewsheds no longer show where the ground can be seen: they show where the treetops can be seen. This is due to the default value of LineOfSightOperator.MinVisibilityHeightType.
To indicate that tree heights are used, we ought to enable the land use layer:
 |
The default VisibilityOperator.SensorHeight that we use is 35 m, so it is higher than any possible obstacles in our example. But with a lower sensor height or higher trees, there could be no viewshed generated at all, if the observer were placed among trees higher than itself.
In an application (rather than in Carmenta Explorer), it would be possible to have a user interface for changing the tree-height table dynamically. However, after each such change, the application should call Operator.FlushCache to flush any data that has been cached by the operator.
LOS Visualization for Undefined Elevation Data
When elevation data are missing in some area, it can happen in two ways:
There could be no elevation raster at all in the area, or
There could be some elevation raster, but some of its cells contain the UndefinedValue that represents missing data.
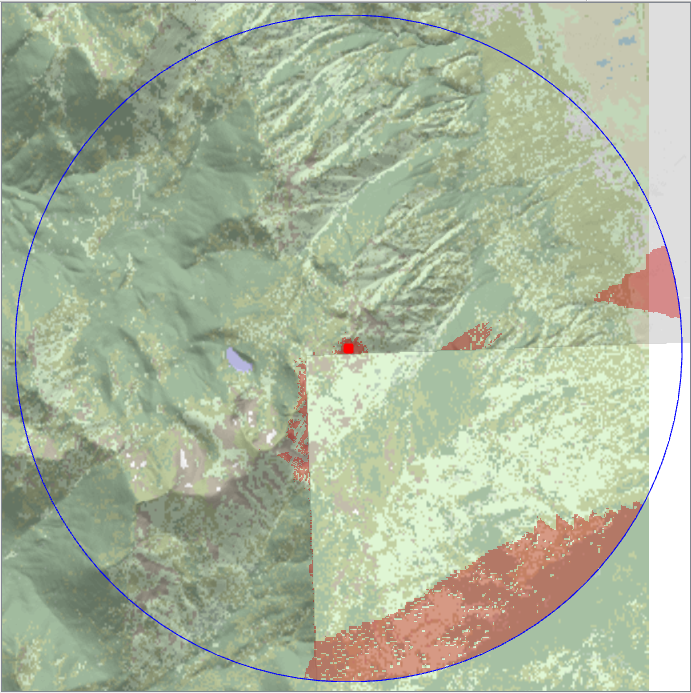
If no elevation raster at all can be found for the observer position, the LineOfSightOperator will not produce any LOS raster. But if some elevation raster covers the observer position, and this position or some other areas within range have undefined elevations, then the resulting LOS rasters depend on the LineOfSightOperator.UndefinedElevationInterpretation. By default, the setting is NegativeElevation, which simply interprets undefined elevations as −500 m. When the extent of defined elevations is clear anyway, for example from a hillshading layer, this crude interpretation can be sufficient. However, in our example with tree heights, the rasters with terrain types have a larger extent than the elevations, and the crude interpretation can give a LOS result that is misleading:
 |
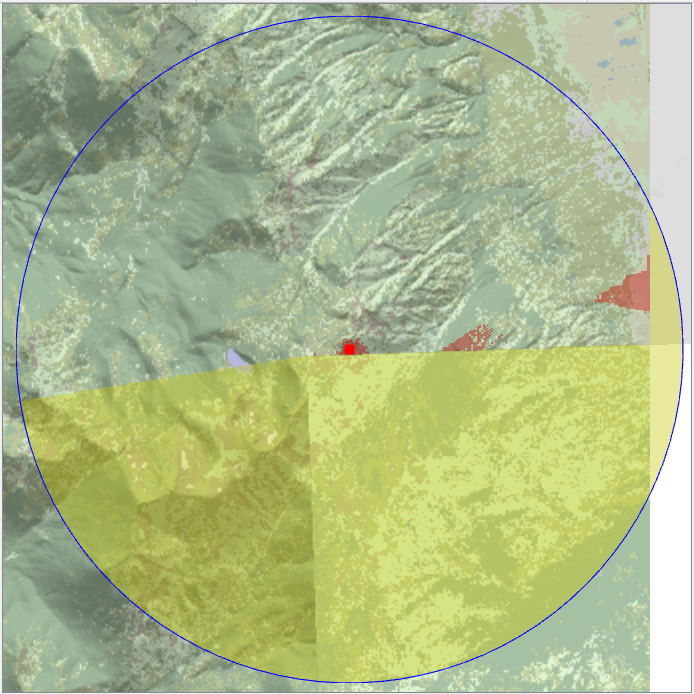
A better option is then to choose the setting UnknownElevation, which means that areas with undefined elevations, and other areas beyond them, will get a special value of −32768 in the LOS raster. The special value, which represents an uncertain visibility status, must appear first in the color table with a distinct color. In the configuration sample .../samples/MapConfigurations/line_of_sight_trees.px, we have chosen yellow for the uncertainty value:
 |
See Also
Reference
VisibilityOperator
LineOfSightOperator
TargetLineOfSightOperator
VisibilityIndexOperator