Basic Map Application Tutorial
In this tutorial you will learn how to develop an application to view a geographic background map and an application data layer. You will also learn how to add panning, zooming, and adding application data using the tools provided in Carmenta Engine.
Before you start ensure that you have complete installations of Microsoft Visual Studio 2022 with the .NET desktop development workload, Carmenta Engine 5 SDK and Carmenta Engine Samples Geodata.
The result of this tutorial is also included as a sample application in the Carmenta Engine SDK.
Step 1: Create main application
Start Visual Studio and create a new Visual C# project of the "Windows Forms App" type. Name it "BasicMapApplication" and select target framework .NET 6.0 or later. You will now see the Design view for Form1.cs.
From the Solution Explorer, open the properties of the new project. Go the Build tab, and change platform target from 'Any CPU' to 'x64'.
Add basic UI components to the main form in the Design view. Open the Toolbox and drag a StatusStrip to the bottom. Then add a SplitContainer to the center of the form.
Add Carmenta Engine as a package source if not done before:
Select Tools -> NuGet Package Manager -> Package Manager Settings, and then select Package Sources.
Add a new entry, name it CarmentaEngine, and point it to the 'packages' folder in the Carmenta Engine SDK folder.
Add references to Carmenta Engine packages:
In the Solution Explorer under your application, right click and select Manage Package References...
At the top-right of the Package Manager window, select the CarmentaEngine package source you just added.
Select the Browse tab, and add and install the Carmenta.Engine and Carmenta.Engine.Forms packages.
Add code to initialize Carmenta Engine. Open the Program.cs from the Solution Explorer. Add a "using Carmenta.Engine;" line to the top. Then call the Runtime.Initialize() method in Main() and add a try-finally block to handle shutdown properly, by calling Runtime.Shutdown() in the finally clause. Your code should now look like:
static void Main()
{
    try
    {
        Runtime.Initialize();
        ApplicationConfiguration.Initialize();
        Application.Run(new Form1());
    }
    finally
    {
        Runtime.Shutdown();
    }
}
This code will initialize the runtime using your SDK license, when developing applications for runtime deployment on other machines you must provide a Runtime license in the Initialize() call.
Add the map control. Edit the Form1.cs by selecting View Code from the right-click menu. Add using statements for Carmenta.Engine and Carmenta.Engine.Forms to the top of the file. Add a member "MapControl mapControl_;" to the Form1 class. In the Form1 constructor initialize the mapControl_ member with a new MapControl() instance, set its Dock property to DockStyle.Fill and add it to Controls of Panel2 in splitContainer1. The code should now look like:
public partial class Form1 : Form
{
    MapControl mapControl_;

    public Form1()
    {
        InitializeComponent();

        mapControl_ = new MapControl();
        mapControl_.Dock = DockStyle.Fill;
        splitContainer1.Panel2.Controls.Add(mapControl_);
    }
}
Add a map configuration. Open the Windows Start menu. Select "Carmenta Engine 5 SDK > Sample Map Configurations". Right click the topographic_map.px and select "Edit in Carmenta Studio". In the Carmenta Studio window select Save As from the File menu and navigate to the folder containing your solution (.sln) file, and save the file as basic_map_application.px. Check that the configuration is working by opening the Carmenta Explorer from the Tools menu in Carmenta Studio.
Attach the configuration to the map control. In the Form1 constructor add code to create a Configuration instance and assign the View property of the map control to the main view of the map configuration. It is a good practice to do operations such as loading files in a try-catch block. The code should now look like:
public partial class Form1 : Form
{
    MapControl mapControl_;

    public Form1()
    {
        InitializeComponent();

        mapControl_ = new MapControl();
        mapControl_.Dock = DockStyle.Fill;
        splitContainer1.Panel2.Controls.Add(mapControl_);

        try
        {
            Configuration configuration = new Configuration(@"../../../basic_map_application.px");
            mapControl_.View = configuration.GetPublicObject(@"TopographicMap")
                as Carmenta.Engine.View;
        }
        catch (Exception e)
        {
            MessageBox.Show(e.Message);
        }
    }
}
The path to the configuration file is three directories up since the output folder when building the executable is three levels below the solution folder. The name of the main view is as defined in the configuration, you can find it by viewing the left-most box of the graph-view in Carmenta Studio.
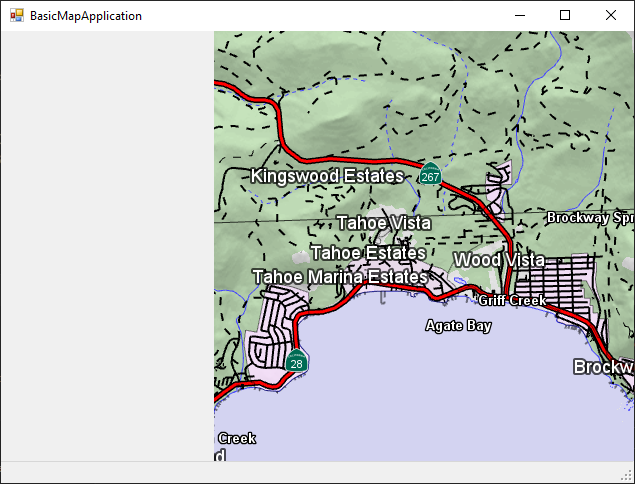
Test your application. Press Start Debugging button (or F5) in Visual Studio. The application should now be built and started like below:
 |
Step 2: Add user-interaction to the map
Create a StandardTool for interacting with the map. Add it as a class member to Form1:
StandardTool standardTool_;
At end of the constructor of Form1, instantiate the tool and assign the Tool property of the map control to it.
standardTool_ = new StandardTool();
mapControl_.Tool = standardTool_;
Press Start Debugging to try it out. You can now press and drag with the left mouse button to pan the map and zoom with the mouse wheel or the right mouse button.
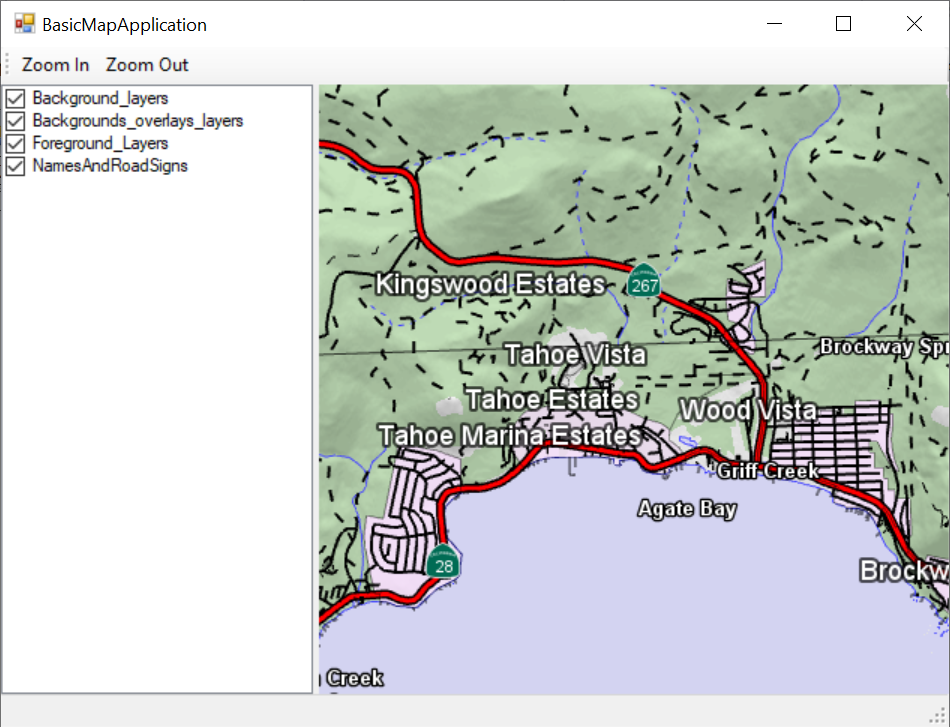
Add some more user interaction to the application: In the Design view of Form1.cs, add a ToolStrip in the top part of the window (you may need to select the SplitContainer and click 'Bring to front' in the right-click context menu to prevent the ToolStrip from overlapping the SplitContainer). Then add two buttons to the tool strip by clicking the menu icon in the strip and selecting Button twice. Edit the properties of the buttons to set the DisplayStyle to Text and the Text property to "Zoom In" and "Zoom Out" respectively.
 |
Add event handlers to the buttons. Double-click the "Zoom In" button in the designer. In the event handler, add code to adjust the view scale by a factor of 2. The map control does not update itself each time an attribute is changed, therefore an explicit update should be done:
private void toolStripButton1_Click(object sender, EventArgs e)
{
    mapControl_.View.Scale /= 2;
    mapControl_.UpdateView();
}
Do the same for the "Zoom Out" button, but double the scale instead.
Step 3: Add a layer control
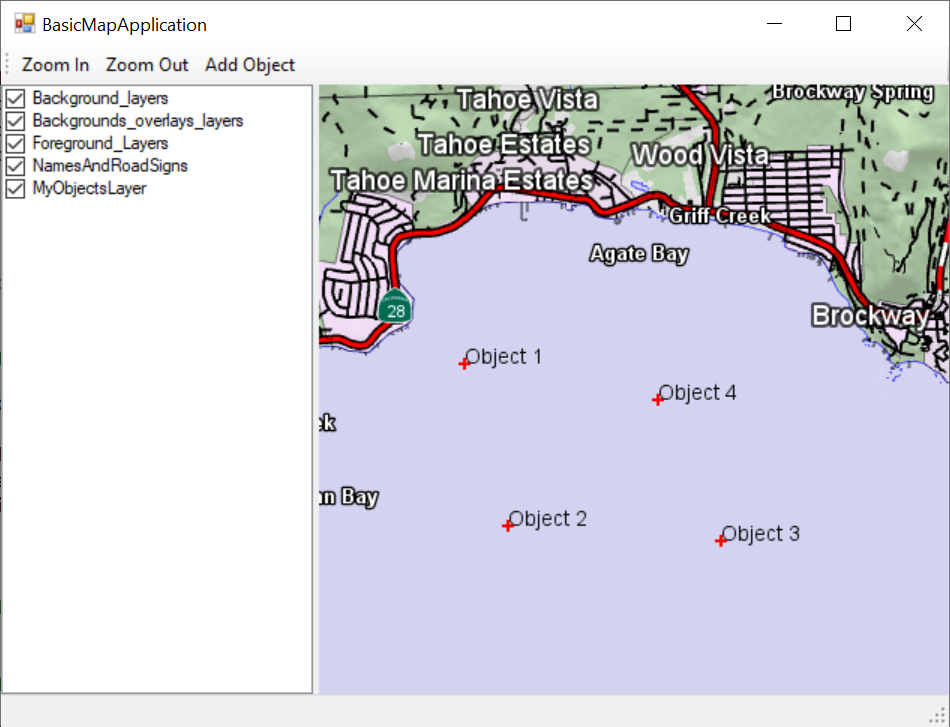
Now add a layer control to the application. In the Design view of Form1.cs, drop a CheckedListBox onto the left panel of the form. Change its Dock property to Fill and IntegralHeight to False, to make it fill the left panel of the window.
Switch to the Code View of Form1.cs. Add a new method called InitLayerList to the end of the class. In its body, loop through the layers of the view, and add them to the list box:
private void InitLayerList()
{
    foreach (Layer layer in mapControl_.View.Layers)
    {
        checkedListBox1.Items.Add(layer.Name, layer.Enabled);
    }
}
At the end of the Form1 constructor, add a call to the InitLayerList method. Press Start Debugging to try it.
 |
Add an event handler when the user checks one of boxes in the list: In the designer, select the list box, go to the property editor and double-click the ItemCheck event. In the event handler, locate the corresponding layer and use the NewValue property of the EventArgs to enable or disable the layer:
private void checkedListBox1_ItemCheck(object sender, ItemCheckEventArgs e)
{
    string s = checkedListBox1.Items[e.Index].ToString();
    foreach (Layer lay in mapControl_.View.Layers)
    {
        if (s == lay.Name)
            lay.Enabled = (e.NewValue == CheckState.Checked);
    }
    mapControl_.UpdateView();
}
Run it and make sure that you can show and hide the different layers in the map.
Step 4: Add an application data layer and a CreateTool for inserting features
In this step, we will add another layer to the map configuration, to display some application data on top of the background map. To add the application data to the map, we will use a CreateTool.
Before you perform this step, it is a good idea to do the Basic Vector Configuration Tutorial to learn the basics about working in Carmenta Studio.
Open the basic_map_application.px configuration in Carmenta Studio and select Menu -> View -> Medium Nodes. Add an OrdinaryLayer in the tree, right below the "NamesAndRoadSigns" layer. Also add a VisualizationOperator and a ReadOperator. Call the layer "MyObjectsLayer".
Add a MemoryDataSet to the ReadOperator and check the Public checkbox of the MemoryDataSet. The Crs should preferably be set to the Crs of the View (make a reference). Call the dataset "MyMemoryDataSet".
Also add a SymbolVisualizer and a TextVisualizer to the VisualizationOperator. Set the text property of the TextVisualizer to indirect lookup from the "name" attribute. The SymbolVisualizer will use the default "small plus" symbol.
Go back to the code and add new members "MemoryDataSet memoryDataSet_", "Atom nameAtom_", "AttributeSet attributeSet_", "CreateTool createTool_" and "int objectNumber_ = 1" to the code. In the constructor, after the configuration is loaded, initialize the uninitialized members:
memoryDataSet_ = configuration.GetPublicObject("MyMemoryDataSet") as MemoryDataSet;
nameAtom_ = new Atom("name");
attributeSet_ = new AttributeSet();
createTool_ = new CreateTool(memoryDataSet_, attributeSet_);
The CreateTool will copy the attributes in the AttributeSet to the features it creates. To set the initial name attribute and increment the object number, add the following code in the constructor after initializing the attributeSet member:
attributeSet_[nameAtom_] = "Object " + objectNumber_++;
Add a new toolbar button, set DisplayStyle to Text, CheckOnClick behavior to true, and the name property to "Add Object". Make it toggle the StandardTool and CreateTool by adding the following event handler:
private void toolStripButton3_Click(object sender, EventArgs e)
{
    if (toolStripButton3.Checked)
       mapControl_.Tool = createTool_;
    else
       mapControl_.Tool = standardTool_;
}
Add an event handler, "OnFeatureCreated", and hook it up to the FeatureCreated event of the CreateTool inside the constructor.
createTool_.FeatureCreated += OnFeatureCreated;
In this event handler, we switch back to the StandardTool, and uncheck the Toolbar button. We also increment the object number and update the "name" attribute in the AttributeSet used when creating new features:
private void OnFeatureCreated(object sender, FeatureCreatedEventArgs e)
{
    mapControl_.Tool = standardTool_;
    toolStripButton3.Checked = false;

    attributeSet_[nameAtom_] = "Object " + objectNumber_++;

}
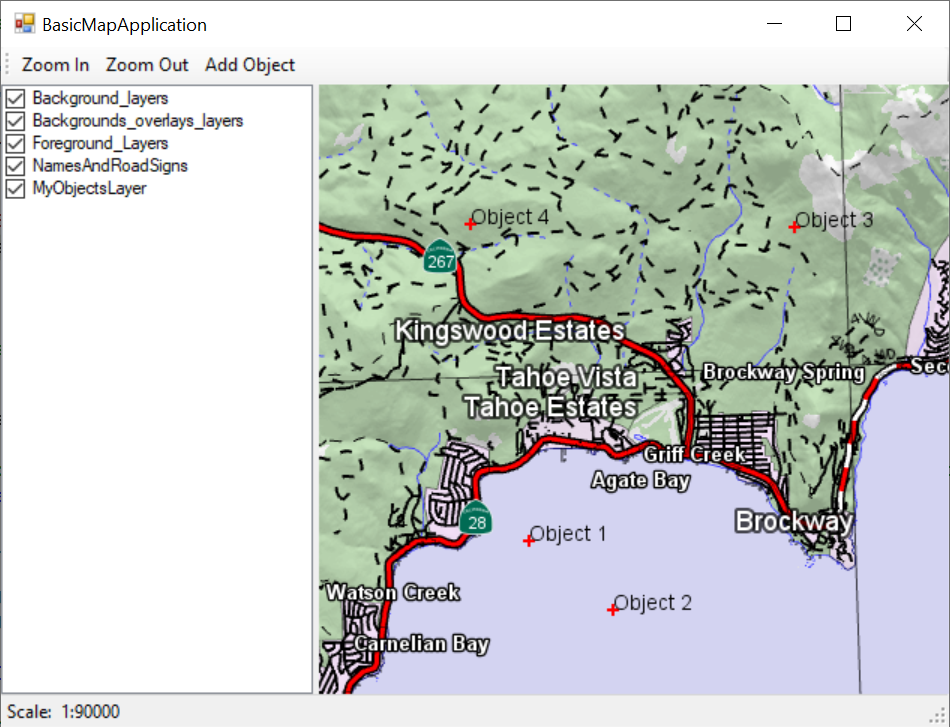
Test the application. You should now be able to create new features by first pressing the "Add Object" button in the toolbar, and then left clicking on the map. You can go back to navigating the map by right clicking again.
 |
Step 5: Add handling of events from map control
As a last step, we will add an event handler for the AreaChanged event of the view. In the handler we will update a text field in the status bar to show the current view scale.
In the designer, add a StatusLabel to the status bar by selecting the status bar and clicking on the drop down button. Call it "scaleLabel".
Add a new event handler to the form class, and hook it up to the AreaChanged event of the view. In the handler, get the view scale and update the label:
private void OnAreaChanged(object sender, EventArgs e)
{
    // Get the current scale from the view, and update the scale label
    long scale = (long)mapControl_.View.NominalScale;
    string s = "Scale:  1:" + scale;
    scaleLabel.Text = s;
}
Congratulations! You have now created a simple map application with some basic map interaction, various event handlers, and some simple functionality for creating application objects and displaying them on the map!
Your final application should look something like this:
 |